Hey hey hey! Haven't had much time to post, but that's only because I've been hard at work prepping and painting. Trying to ramp up speed on the Ogre Kingdoms project and so yesterday I did some inter-painting prep with the Mournfang Cav by finishing up the flock on the bases and priming them. Since I also need to paint their Standard Bearer's arm seperately, I figured putting finishing touches on the metal parts of the riders was pointless if I could do it all at once. So, with that in mind, I set the Mournfang aside for a day for drying and decided to prep some future work for the chopping block.
I started by cleaning up my finecast Sabretusk models. A super pain in the rear, but getting it out of the way will make it easier to sit down and paint them. I also pulled out a recently purchased Ogre Hunter model that I planned to convert and began going to town. Although the Ogre Project, when finished, should allow me to have tons of options, I've had my sights set on a list that includes a level 4 Slaughtermaster with Lore of the Great Maw and a Level 2 Butcher with Lore of Beasts... With my Slaughtermaster complete (see earlier post) I didn't want to do another traditional butcher model with the guts and gore. I figured a Lore of Beasts Ogre would look a bit more natural... feral even.
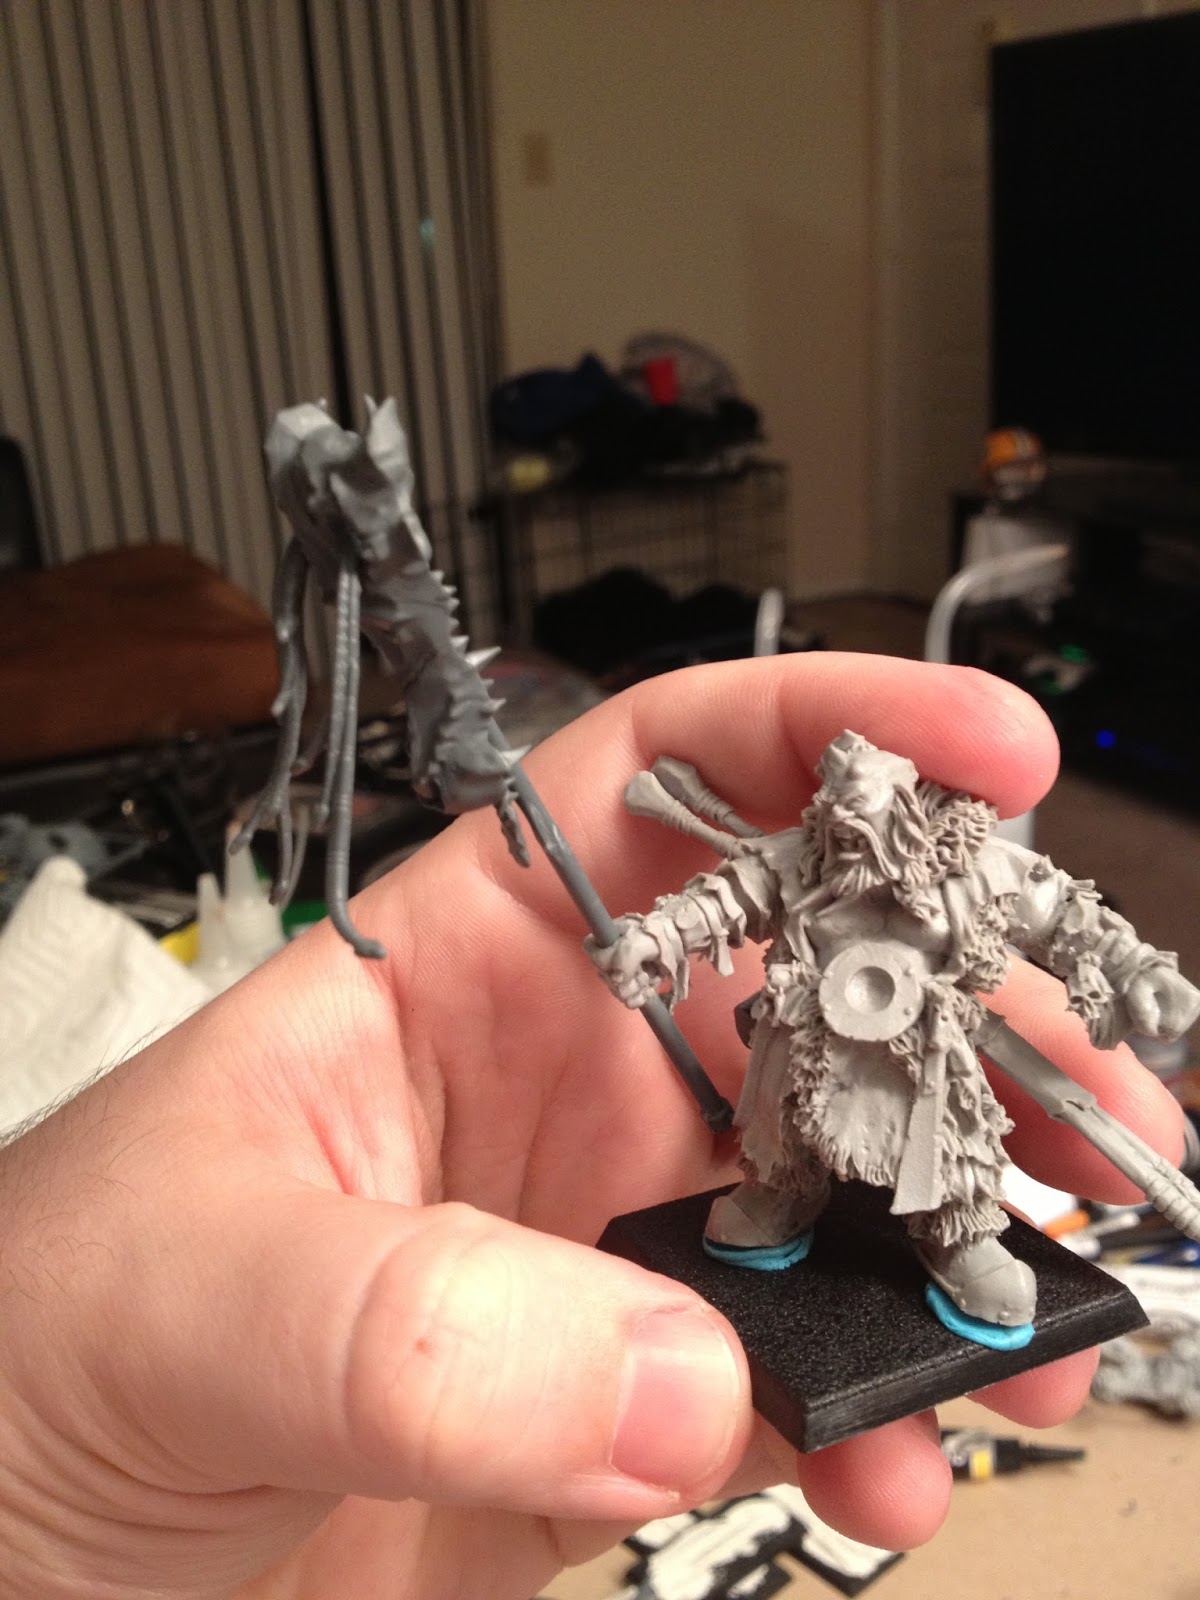
I cleaned up the model the best I could (All thats left for him and the Sabretusks are some greenstuffing and filling) and began work on conversion.
His club had to go. To me, it just didn't speak "Wizard." I decided to give him a staff. I cut the club from his hand and drilled a hole, using a hobby knife to smooth the edges around his grip.
Spare parts from my extra Mournfang Cav box proved useful. I cut the Banner off of the Standard and shaved the pole down to make a staff (still trying to decide to leave the staff as metal or go for a wooden one - he's an ogre, right?) To make the model more durable, I drilled a small hole into each side of the staff proximal to his hand as you'll see below.
Voila. Afterwards I added the dragon skull from the Mournfang standard to the end of the staff. He's starting to look more wildmage-ish alreadY!
Now... I had these plans for quite some time (to make the Beast Wizard). While I was at Games Day last month in the hotel reading the new white dwarf and drooling over the lizardmen models, one particular bit stood out to me. The Bastilodon with the Ark of Sotek and it's many snakes made me smile big. For the reason seen below.
Very, very happy with the way he turned out. Can't wait to paint him. I stuck some other bits on him you can't really see from these angles, including a sack and a rack of ribs hanging on his back. Also, I shaved down the spears on his back to look more like staves with gem heads. This will help him continue to stand out as a magic user, rather than a killy character (Hunters are terrible anyways).
With all that progress in the bag last night, I shifted my focus tonight back to the Mournfang. Another reason I paused in painting last night is because I had some more airbrushing work to do and I don't like airbrushing unless I'm doing a bunch of different things at once. Never tried airbrushing a banner before, so I figured I'd give it a shot. Don't really have a step by step for you because I was concentrating but I got the most important pieces.
Below you'll see the first step. I drew a crude (Ogres!) stencil of the image I wanted on the banner. Don't know why I picked what I did - kind of like the main ogre symbol (The Maw) with dot in the middle to make a sun. Sweet. Again, crude design on painter's tape with a pencil and then used a hobby knife to cut out the pieces
Now, an undercoat for the banner. I had primed the banner white. With the airbrush and blending, I prefer to start with a light or mid tone and then shade (as done here - some models work the other way). So I painted the banner with Vallejo Air Scarlet red. I did some light shading with the single color, hitting the recesses and shady areas a litter harder with the paint. After that was dry, i came back in with Vallejo Air Mahogany and shaded much deeper. Here you see the finished red base.
So, Keith, you're painting a red banner? No! This is our base for the stencil. I used a pair of tweezers to stick the stencil pieces onto the banner. Now the real work begins!
Airbrushing with several layers, starting light to dark, I finished up the main colors on the banner. Although I didn't do a step by step, it wouldn't have helped without a video. The main thing is to pay attention to where the light would hit the model. Where light hits - use your brightest color there. When you come back with each successive shade, hit the underside of the banner, where it will be darkest.
Practice makes perfect - I did go a little extreme with the bottom of the banner where it is tattered - to show that it is dirty/burned.
Colors used in succession are all vallejo air:
White > Sand > Light Brown > Flat Brown> Light Camo Brown > Burnt Umber
After the paint - i used the tweezers to peel off the tape and Boom! Heres your banner! Now all thats left, hopefully tomorrow, is to complete the details on the pole and the dragonscales on the banner - then it'll be ready to reroll some 1s and unleash it's breath weapon!
Again - don't like to airbrush unless I have lots to do, so I did the airbrushing work on the Mournfang bases as well. I'll hit them with a dullcote so that I can mount the cats on them and paint em up!
Progress shots for the week... Yes! Going well.